 Here’s the Best Starting Point to Learn About the Knowledge Graph
I’ve always favored a way to describe the first successful operation of a computer program as ‘first twitch.’ It brings to mind the stirrings of Dr. Frankenstein’s monster when first zapped with electricity. It is the moment when we first see how something works, and that it might continue to work into the future.
The ‘monster’ on the table for today’s exercise is KBpedia, which I have been talking about much recently since we released it as open source in late 2018. KBpedia is a computable knowledge graph that sits astride Wikipedia and Wikidata and other leading knowledge bases. Its baseline 55,000 reference concepts provide a flexible and expandable means for relating your own data records to a common basis for reasoning and inferring logical relations and for mapping to virtually any external data source or schema. The framework is an increasingly clean starting basis for doing knowledge-based artificial intelligence (KBAI) and to train and use virtual agents. KBpedia combines seven major public knowledge bases — Wikipedia, Wikidata, schema.org, DBpedia, GeoNames, OpenCyc, and UMBEL.
It is mighty hard to describe knowledge graphs or ontologies in the abstract. This difficulty is especially hard when trying to convey a knowledge graph to someone who is not familiar with semantic technologies and tools. Thus, while in subsequent posts over the coming weeks I will dive into more details, my purpose today is to help those with little background to put in in place a sufficient basis to gain their own ‘first twitch’ for KBpedia. We will do so with only a small portion of the KBpedia distribution package and an open-source tool called Protégé. Hopefully, with about 15-30 min of effort, you can set up your own local environment to get KBpedia to twitch. (Five min if you already have Protégé installed.)
It’s alive!
Getting Set Up
We will begin our familiarization using only two files from the open source KBpedia distribution package. First, go to the KBpedia GitHub repository and download the two files of the kko.n3 and kbpedia_reference_concepts.zip. In the case of kko.n3, which is the small upper ontology for KBpedia, you will copy-and-paste the code to a local file and name it the same. In the case of kbpedia_reference_concepts.zip, which contains the main substance of KBpedia, you should download the file and then unzip it in a directory you can find on your local machine. The unzipped file is called kbpedia_reference_concepts.n3. For simplicity, put this and kko.n3 file into the same directory. (In our production settings we use multiple sub-directories.)
Second, you will need to download and install Protégé, an open-source ontology development framework with more than 300,000 users. (There are other ontology viewers or development frameworks that can readily run KBpedia, but Protégé is the most widely used, free one.) Go to the Protégé download page and follow the instructions for your particular operating system. You should fill out the new user registration (though you can claim you are already registered and still download it directly). The version I installed for this example is version 5.5 beta (though any of the version 5.2 forward should be fine as well.) The Protégé distribution comes as a zip file, so you should unzip it into a directory of your choice. To complete the set-up you will also need the most recent version of Java installed on your machine; it you do not have it, here are installation instructions.
Next, to start up Protégé, invoke the executable in your Protégé directory. It will take a few seconds for the program to load. Once the main screen appears, go to File and then Open, and then navigate to the directory to where you stored kbpedia_reference_concepts.n3. Pick that file and click the Open button.
The first time you load KBpedia you are likely to get the following error message:
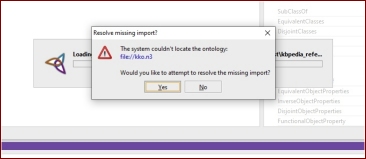
Figure 1: Possible Error Message Upon Loading
Follow the instructions on the screen to find the second needed file, kko.n3, which I just suggested you store in the same directory. (Once you save your current session, the next time you start up this error will not appear.) Also, next you work with the system, you can open KBpedia by using the File → Open Recent option. Lastly, you may encounter some performance or display issues. I conclude this article with a couple of use tips for Protégé.
Taking the Tour
Upon successful start-up, you will see the Protégé main screen as shown in Figure 2. Let me briefly cover some of the main conventions of the program. The three key structural aspects of the Protégé program are its main menu, its tab structure, and the views (or panes) shown for each tab where it appears on the standard interface ( ⓹ ). At start-up we always begin at the Active ontology tab, for which I highlight some of its key panes and functionality:
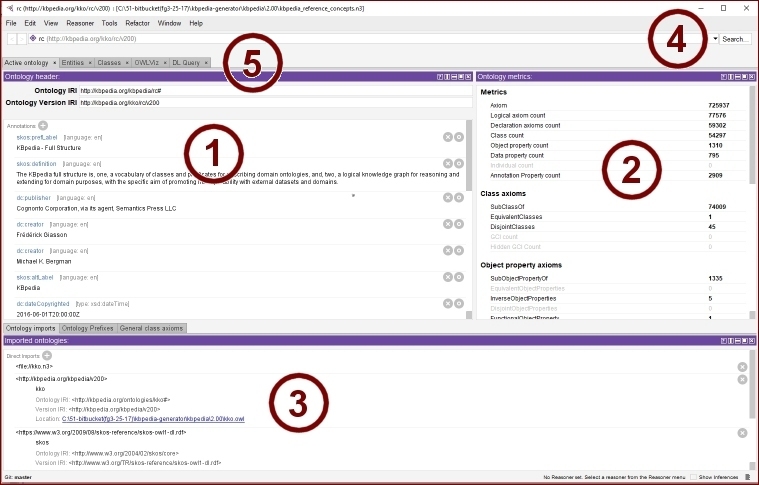
Figure 2: Main KBpedia Screen on Protégé
The ontology header section ( ⓵ ) is where all of the metadata for the knowledge graph resides. Such material includes title, creators, version notes and so forth. The metrics for the ontology resides in the second view ( ⓶ ). We see, for example, that this expression of KBpedia has more than 54,000 classes (reference concepts) and more than 5,000 properties. We also see in the third view ( ⓷ ) that KBpedia requires the SKOS and KKO ontology imports. Also note the search button ( ⓸ ), which we will use frequently, and the tab structure and order ( ⓹ ). We will modify that structure in our next set of steps.
Because Protégé, like many integrated development environments (IDEs), is highly configurable, let’s detour for a short step to see how we can modify how our program looks. I am going to delete and add tabs to make the tab structure conform to the remaining screen shots.
To change tabs in Protégé, let’s refer to Figure 3:
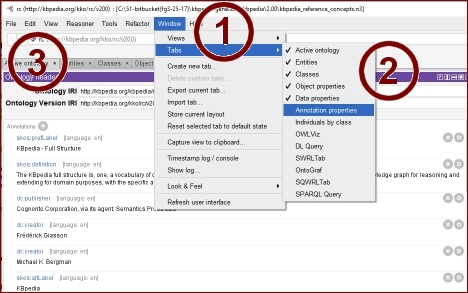
Figure 3: Adding Tab Views to Protégé
We effect the general layout of the system using the Window → Tabs option from the main menu. You delete a tab by clicking on the arrow shown for each tab as presented in the standard interface. You add tabs by selecting one of the options in the Tabs menu ( ⓶ ). Note that active tabs are indicated by the checkmark ( ✓ ). New tabs are added to the right of the tab sequence ( ⓷ ). Thus, to change the ordering of tabs, one must delete and then add tabs in the order desired. You can follow these steps if you want the tab ordering to reflect the screen shots below.
[This same main menu Window option is where you can change the views (panes) for each tab. However, we don’t discuss that customization further in this article.]
Discovering and Inspecting Reference Concepts
When your tabs are to your liking, let’s begin inspecting KBpedia itself. Let’s first move to the Classes tab screen, the most important to understanding the hierarchy and structure of KBpedia. Note when we change tabs that the border colors also change. Each tab in Protégé is demarked with its own color. The actual class structure is shown in the left-hand pane ( ⓵ ) in Figure 4. The tree structure may be expanded or collapsed by clicking on the triangles shown for a given item (items without the triangle are terminal nodes). The direction the triangle points indicates the expand or collapse mode. Depending on your Protégé settings, the default opening for this tree may be expanded (by levels) or collapsed. What we are showing in Figure 4 is the highest structure of KBpedia, which can also be separately inspected with the kko.n3 file alone. (Peirce scholars and ontologists may prefer to start there.)
Because KBpedia is an organized, computable structure of types (classes), the majority of the items in KBpedia may be found under the SuperTypes branch ( ⓵ ). This is where you will spend most of your time inspecting the existing 55 K reference concepts (RCs).
Another thing to note is the multi-paned structure of the layout ( ⓶ ), which I noted before. These panes are configurable, and may be moved and resized at any location across the tab. Figure 4 is close to the default Protégé settings.
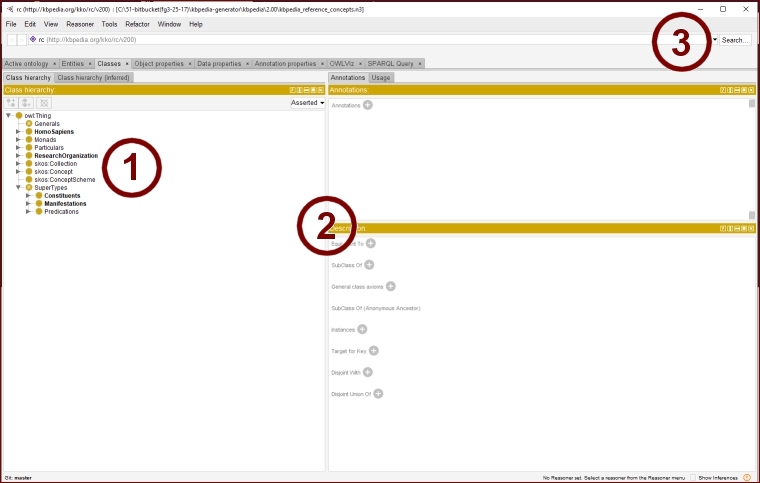
Figure 4: Initial View from the Class Tab
Search ( ⓷ ) is one of the most important functions in the system, since it is the primary way to find specific RCs when there are thousands. Search is also useful for all other information in the system. Given this importance, let’s take another short detour to the search screen. Click search.
That brings up the search screen, as shown in the next Figure 5. There is some interesting functionality here, worth calling out individually. Let’s begin a search for ‘mammal’:
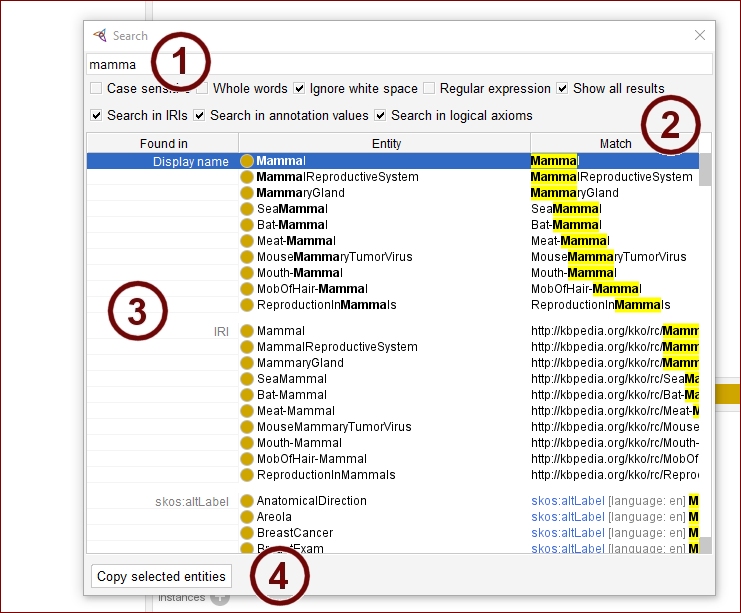
Figure 5: Class View After Doing A ‘Mammal’ Search
As we enter the search term, only ‘mamma’ so far in the case shown, there is a lookahead (auto-complete) function to match the entered text ( ⓵ ), beginning with three characters. It is also important to note there are some pretty powerful search options ( ⓶ ); I often use the Show all results choice, though sometimes lists can grow to be huge! (Using few search characters for common letter combinations, for example).
The search screen organizes its results into multiple categories ( ⓷ ) (scroll down), including descriptions and annotations. The most important matches, namely to preferred labels and IRIs, appear at the top of the listing. It is also possible to highlight results on these lists and create copies ( ⓸ ) for posting to the clipboard. I use this functionality frequently.
Once we have selected ‘Mammal’ from the search results list, the search screen remains open (useful for testing many putative matches), and the tree in the Class view updates and more RC results are automatically displayed, as Figure 6 shows (in this case, I have closed the search screen so as to not obscure the main screen):
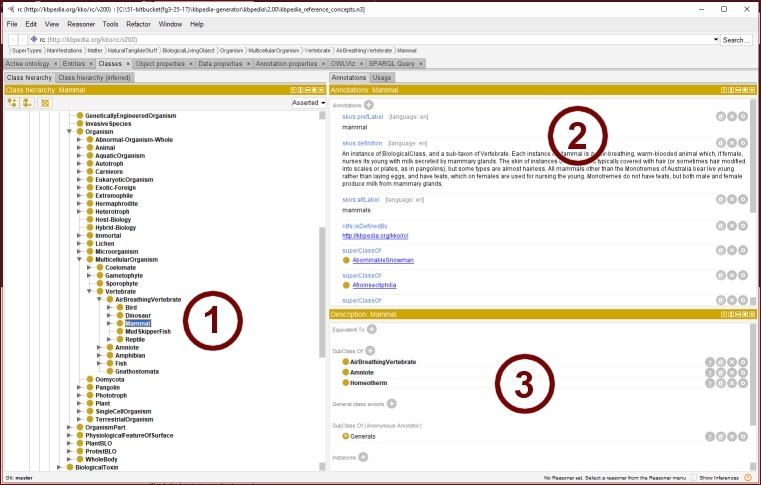
Figure 6: Class View After Doing A ‘Mammal’ Search
We now see a much-expanded tree in the left Class hierarchy pane ( ⓵ ). We can again click the triangles to collapse or expand that portion of the tree.
For the selected item in the tree, again ‘Mammal’ in this case, we can see its annotations and linkage relationships ( ⓶ ), including labels, descriptions, notes and links. The Descriptions pane ( ⓷ ) shows us the formal relationships and other assertions for this RC in the knowledge graph. (Since we are not working with all KBpedia files, this portion may not be as complete as when all files are included.)
Thie general process can be repeated over and over to gain an understanding. You can navigate the tree via scrolling and expanding and collapsing nodes, or searching for terms or stems as you encounter then. Of course, both navigation and searching are done concurrently during discovery mode. It is this process, in my view, that best leads to first twitch for KBpedia by better understanding the structure, scope and relationships for the graph’s 55 K reference concepts.
Discovering and Inspecting Properties
These same conventions and approaches may also be used for understanding the properties (relations) in KBpedia, as I show in Figure 7. First, note ( ⓵ ) we have split our properties into three groups: object properties, data properties, and annotation properties:
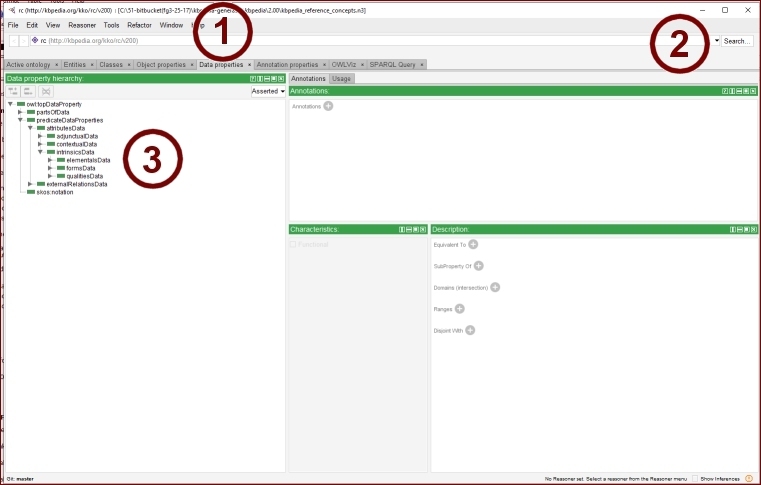
Figure 7: Initial View from the Object Property Tab
These are the standard splits in the OWL language. How we use these splits and their relation to the guidance of Charles Sanders Peirce is described in another article. In essence, object properties are those that connect to an item (with a URI or IRI) already in the system; data properties are literal strings and descriptions connected to the subject item; and annotation properties are those that describe or point to the item. We’ll just use an object property example here, though the use and navigation applies to the other two property categories as well
The Object properties tab in Figure 7 also has a search function ( ⓶ ), exactly similar to what was described for classes. We also see a tree structure at the left that works the same as for classes ( ⓷ ). However, besides the relations splits due to Peirce, there are two other major property differences for KBpedia compared to most knowledge graphs or ontologies. The first difference is the sheer number of properties, more than 5 K in the case of KBpedia. The second is the logical organization of those properties, beginning with the three splits due to Peirce, but extending down to an emerging, logical hierarchy of property types.
To see some of this, let’s do a search for the property ‘color’ [( ⓶ ) in Figure 7]. The result, again working similar to what we saw for classes, I show in Figure 8:
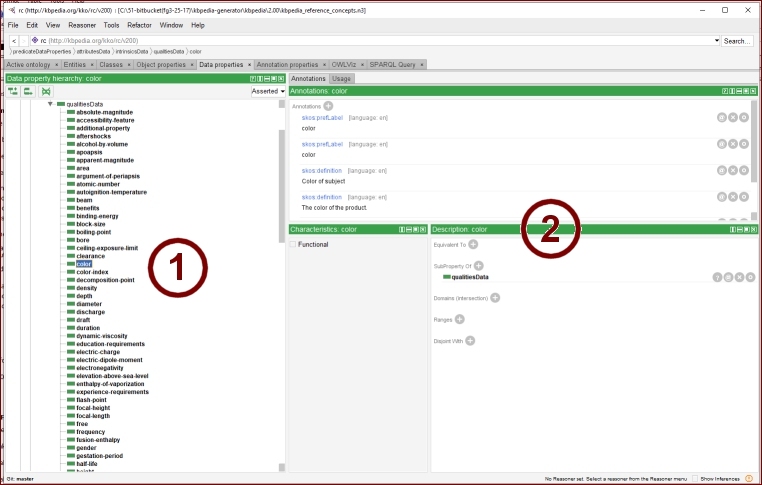
Figure 8: Object Property View for ‘color’
Like before, we now see an expanded tree highlighting the ‘color’ property ( ⓵ ), again accompanied by metadata and other structural aspects of the Object properties ( ⓶ ).
As before, you can use a combination of scrolling, tree expansions and searching to discover the properties in KBpedia. Do make sure and check out the Data properties and Annotation properties tabs as well.
Performance and Preferences
You very well may experience some performance issues with Protégé as it comes out of the box. One likely cause are the memory settings that you may find in the run.bat file that you can find in the main directory where you installed Protégé. As a quick fix, try updating these settings in that file to these values before the next time you start the application:
-Xmx2500M -Xms2000M
Also note there are many customization options in Protégé. If you get captivated with the tool, I encourage you to explore the plugins available and the ways to modify the application interface. See especially File → Preferences, with the Renderer and Plugin tabs good places to look.
The Framework is a Beginning
These two files are at the core of KBpedia, but do not constitute its entirety. These two files are likely the simplest, adequate representation for entering the KBpedia construct.
I will be talking in coming weeks about additional aspects of discovering what is in KBpedia and how it may be used. We’ll be talking about working with the system, use cases, and how to discover more about the system using the KBpedia Web site. I do think, however, that the basic inspections of the system outlined here are one of the better ways to get familiar and feel a twitch with the system.
There are many moving parts in KBpedia and much interconnection. We are constantly finding and fixing errors in addition to improving the scope of the system. Should you encounter questionable assignments or missing relationships, please do let us know. We welcome all suggestions for improvements and commit to continued quality improvements and releases.


This is an excellent intro to kbpedia via protege!
Much thanks.
Hi Jeroen,
Thank you!
Mike
Thank you very much for this. I got the twitch. But I am confused by the concepts I see, exploring the KBpedia. Could it be that the highest structure of KBpedia has changed since this was written? The left pane showed in Figure 4 of this article looks different than the one I am shown I my local installation of Protegé. The SuperTypes node for instance – which is of very high importance – seems to have been ‘flattened’ , its internal concepts now upgraded to the top level, along with several other concepts which are not present in the top layer shown in Figure 4, where there are just 9 concepts. Some 55 additional concepts in the top layer seems wrong. The concepts I am shown directly under owl:Thing are inconsistent, redundant and there are too may of them (ca. 64).
Hi Tess,
It is not clear to me what you are actually seeing, but it sounds like you are not pulling in the kko.n3 top-level structure. Check out the first paragraph in the ‘Getting Set Up’ section. If you are still having differences, go ahead and send a screen capture to send to me.
Thanks!
Best, Mike