vlookup is Your Friend

One major benefit of large-scale extracts from KBpedia (or any knowledge graph, for that matter) is to produce bulk files that may be manipulated offline more effectively than working directly with the ontology or with an ontology IDE like Protégé. We address bulk manipulation techniques and tips in this current installment in the Cooking with Python and KBpedia series. This current installment also wraps up our mini-series on the cowpoke extraction module as well as completes our third major part on extraction and module routines in our CWPK series.
Typically, during the course of a major revision to KBpedia, I tend to spend more time working on offline files than in directly working with an ontology editor. However, now that we have our new extraction routines working to our liking, I can also foresee adding new, flexible steps to my workflow. With the extraction routines, I now have the choice of making changes directly in Protégé OR in bulk files. Prior to this point with our Clojure build codes, all such changes needed to be made offline in the bulk files. Now that we can readily extract changes made directly within an ontology editor, we have gained much desired flexibility. This flexibility also means we may work off of a central representation that HTML Web forms may interact with and modify. We can now put our ontologies directly in the center of production workflows.
These bulk files, which are offline comma-separated value (CSV) extraction files in our standard UTF-8 encoding, are well suited for:
- Bulk additions
- Bulk deletions
- Bulk re-factoring, including modularization
- Consistent treatment of annotations
- Staging mapping files
- Acting as consolidation points for new datasets resulting from external queries or databases, and
- Duplicates identification or removal.
In the sections below I discuss preliminaries to working with bulk files, use of the important vlookup function in spreadsheets, and miscellaneous tips and guidance for working with bulk files in general. There are hundreds of valuable references on these topics on the Web. I conclude this installment with a few (among many) useful references for discovering more about working with CSV files.
Preliminaries to Working with Bulk Files
In the CWPK #27 installment on roundtripping, I made three relevant points. First, CSV files are a simple and easy flat-text format for flexibly interchanging data. Second, while there are conventions, there are no reliable standards for the specific format used, importantly for quoting text and using delimiters other than commas (which, if used, in longer text also needs to be properly ignored, or “escaped”). And, third, lacking standards, CSV files used for an internal project should adhere to their own standards, beginning with the UTF-8 encoding useful to international languages. You must always be mindful of these internal standards of comma delimitation, quoted long strings, and use of UTF-8.
The reason CSV is the most common data exchange format is likely due to the prevalence of Microsoft Excel, since CSV is the simplest flat-file option offered. Unfortunately, Excel does not do a good job of making CSV usable in standard ways and often imposes its own settings that can creep up in the background and corrupt files, especially due to encoding switches. One can obviously work with Excel to do these things since thousands do so and have made CSV as popular as it is. But for me, personally, working constantly with CSV files, I wanted a better approach.
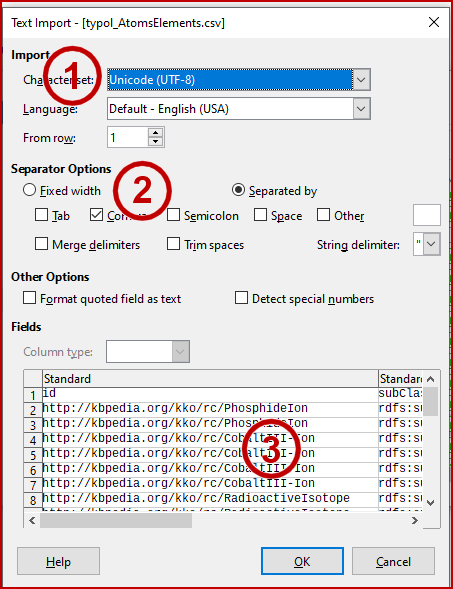
I have found the open-source LibreOffice (what originally began as OpenOffice, which has subsequently been acquired by Oracle) to be a superior alternative for CSV purposes, sufficient for me to completely abandon MS Office. The next screen captures opening a file in LibreOffice and the three considerations that make doing so safe for CSV:

The first thing to look for is that the encoding is UTF-8 (1). There are actually multiple UTF options, so make sure and pick ‘-8’ v ‘-16’ or ‘-32’ options. Second, do not use fixed length for the input, but use delimiters (“separators”) using the comma and double-quoted strings (2). And third, especially when you are working with a new file, scan (3) the first records (up to 1000 may be displayed) in the open screen window so see if there are any encoding problems. If so, do not open the file, and see if you can look at the file in a straight text editor. You can follow these same steps in Excel, it is just out-of-the way to do so. LibreOffice always presents this screen for review when opening a CSV file.
I have emphasized these precautions because it is really, really painful to correct a corrupted file, especially ones that can grow to thousands of rows long. Thus, the other precaution I recommend is to frequently back up your files, and to give them date stamps in their file names (I append -YYYMMDD to the end of the file name because it always sorts in date order).
These admonishments really amount to best practices. These are good checks to follow and will save you potential heartache down the road. Take it from a voice of experience.
vlookup in Detail
Once in CSV form, our bulk files can be ingested into a spreadsheet, with all of the powers that brings of string manipulations, formatting, conditional changes, and block moves and activities. It is not really my intent to provide a tutorial on the use of spreadsheets for flat data files. There are numerous sources online that provide such assistance, and most of us have been working with spreadsheets in our daily work activities. I do want to highlight the most useful function available to work with bulk data files, vlookup, in this section, and then to offer a couple of lesser-known tips in the next. I also add some Additional Documentation in the concluding section.
vlookup is a method for mapping items (by matching and copying) in one block of items to the equivalent items in a different block. (Note: the practice of naming blocks of cells in a spreadsheet is a very good one for many other spreadsheet activities, which I’ll touch upon in the next section.) The vlookup mapping routine is one of the most important available to you since it is the method for integrating together two sets (blocks) of related information.
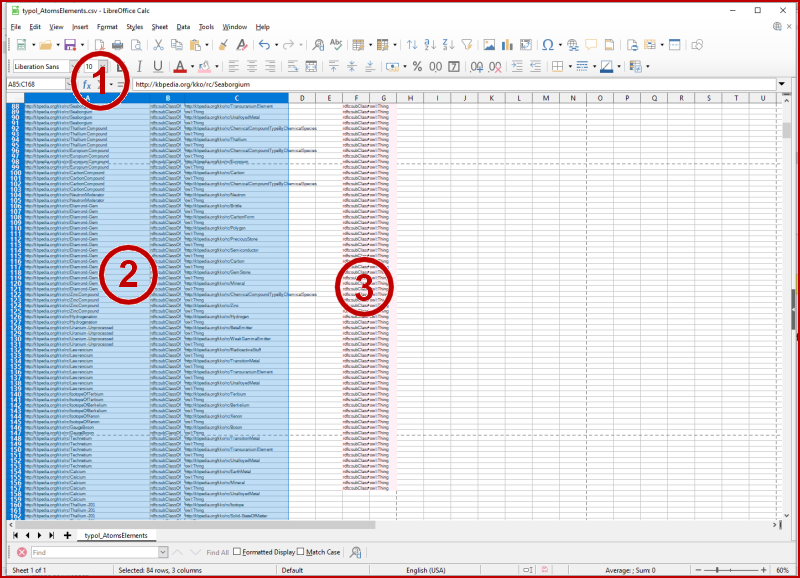
While one can map items between sheets using vlookup, I do not recommend it, since I find it more useful to see and compare the mapping results on one sheet. We illustrate this use of two blocks on a sheet with this Figure 2:

When one has a source block of information to which we want to map information, we first highlight our standard block of vetted information (2) by giving it a name, say ‘standard’, in the block range cell (1) to the immediate upper left from the spreadsheet. Besides normally showing the coordinates of the row and cell references in the highlighted block, we can also enter a name such as ‘standard’ into this cell. This ‘standard’, once typed in later in this same box (1) or picked from a named list of blocks, will cause our ‘standard’ block to be highlighted again. Then, we have potential information (3) that we want to ‘map’ to items in that ‘standard’ name block. As used here, by convention, ‘items’ MUST appear in the first column of the ‘map’ block (3), and only match other items found in any given column of the ‘standard’ (2) block. In the case of KBpedia and its files, the ‘standard’ block (2) is typically the information in one of our extraction files, to which we may want to ‘map’ another extraction file (3) or a source of external information (3).
(NB: A similar function called hlookup applies to rows v columns, but I never use it because our source info is all individuated by rows.)
(NB2: Of course, we can also map in the reverse order from ‘standard’ to ‘map’. Reciprocal mapping, for instance, is one way to determine whether both sets overlap in coverage or not.)
So, only two things need to be known to operate vlookup: 1) both source (‘standard’) and target (‘map’) need to be in named blocks; and 2) the items matched in the ‘standard’ block need to be in the first column of the ‘map’ block. Once those conditions are met, any column entry from the ‘map’ block may be copied to the cell where the vlookup function was called. Once you have the formula working as you wish, you then can copy that vlookup cell reference down all of the rows of the ‘standard’ block, thereby checking the mapping for the entire source ‘standard’ block.
When I set these up, I put the initial vlookup formula into an empty top cell to either the left or right of the ‘standard’ block, depending on whether the possibly matching item is on the left or right of the block. (It’s easier to see the results of the lookup that way.) Each vlookup only looks at one column in the ‘standard’ for items to match against the first column in the ‘map’, and then returns the value of one of the columns in the ‘map’.
The ‘map’ block may only be a single column, in which case we are merely checking for intersections (and therefore, differences) between the blocks. Thus, one quick way to check if two files returned the same set of results is to copy the identifiers in one source as a ‘map’ block to a ‘standard’ source. If, after testing the formula and then copying vlookup down all rows of the adjacent ‘standard’, and then we see values returned for all cells, we know that all of the items in the ‘standard’ block (2) are included in the items of the ‘map’ block (3).
Alternatively, the ‘map’ block may contain multiple columns, in which case what is in the column designated (1 to N) is the value of what gets matched and copied over. This approach provides a method, column by column, to add additional items to a given row record.
Here is the way the formula looks when entered into a cell:
=VLOOKUP(A1,map,2,0)
In this example, A1 is the item to be looked up in the ‘standard’ block. If we copy this formula down all rows of the ‘standard’ block, all items tested for matches will be in column A. The map reference in the formula refers to the ‘map’ named block. The 2 (in reference to the 1 to N above) tells the formula to return the information in column 2 of ‘map’ if a match occurs in column 1 (which is always a condition of vlookup). The 0 is a flag in the formula indicating only an exact match will return a value. If no match occurs, the formula indicates #N/A, otherwise the value is the content of the column cell (2 in this case) matched from ‘map’.
If, after doing a complete vlookup I find the results not satisfactory, I can undo. If I find the results satisfactory, I highlight the entire vlookup column, copy it, and then paste it back into the same place with text and results only. This converts the formulas to actual transferred values and then I can proceed to next steps, such as moving the column into the block, adding some prefixes, fixing some string differences, etc. After incorporation of the accepted results, it is important to make sure our ‘standard’ block reflects the additional column information.
Particularly when dealing with annotations, where some columns may contain quite long strings, I do two things, occasioned by the fact that opening a CSV file causes column widths to adjust to the longest entry. First, I do not allow any of the cells to word wrap. This prevents rows becoming variable heights, which I find difficult to use. Second, I highlight the entire spreadsheet (via the upper left open header cell), and then set all columns to the same width. This solves the pain of scrolling left or right where some columns are too wide.
It takes a few iterations to get the hang of the vlookup function, but, once you do, you will be using it for many of the bulk activities listed in the intro. vlookup is a powerful way to check unions (do single-column lookups both ways), intersections, differences, duplicates, and the transfer of new values to incorporate into records.
Like other bulk activities, also be attentive to backups and saving of results as you proceed through multi-step manipulations.
Other General Spreadsheet Tips
Here are some other general tips for using spreadsheets, organized by topic.
Sorts
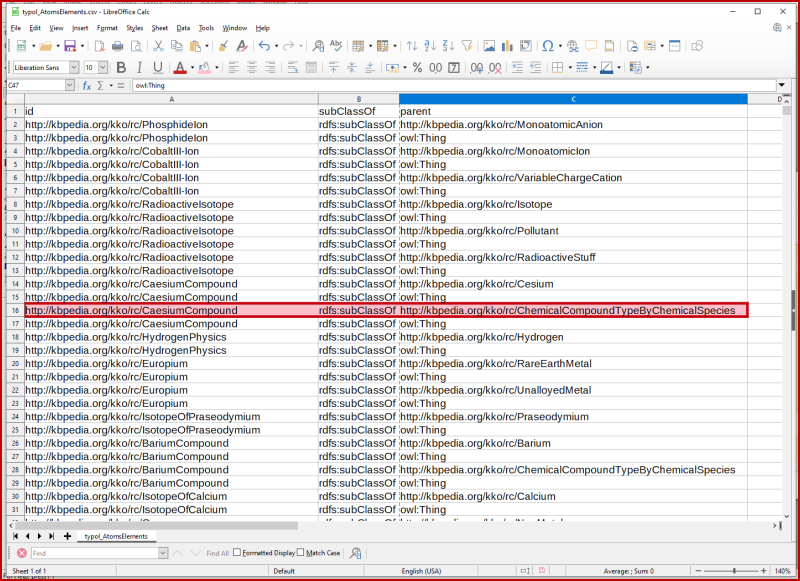
Named blocks are a good best practice, especially for sorts, which are a frequent activity during bulk manipulations. However, sorts done wrong have the potential to totally screw up your information. Remember, our extracts from KBpedia are, at minimum, a semantic triple, and in the case of annotation extractions, multiple values per subject. This extracted information is written out as records, one after another, row by row. The correspondence of items to one another, in its most basic form the s-p-o, is a basic statement or assertion. If we do not keep these parts of subject – verb – object together, our statements become gibberish. Let’s illustrate this by highlighting one record — one statement — in an example KBpedia extraction table:

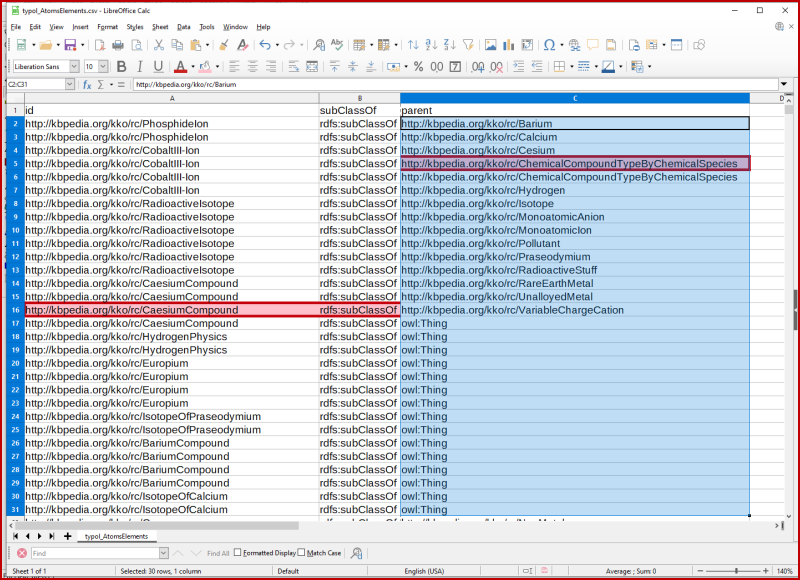
However, if we are to sort this information by the object field in column C, we can see we have now broken our record, in the process making gibberish out of all of our statements:

We prevent the breakage in Figure 4 from occurring by making sure we never sort on single columns, but on entire blocks. We could still sort on column C but without breakage by first invoking our named ‘standard’ block (or whatever name to ‘standard’ we have chosen) before we enter our search parameters (see S & R further below).
Here’s another tip for ‘standard’ or master blocks: Add a column with a row sequence number for each row. This will enable you to re-sort on this column and restore the block’s original order (despite how other columns of the block may alphabetize). To create this index, put ‘1’ in the top cell, ‘1+C1’ in the cell below (assuming our index in in Col C), and copy it down all rows. Then copy the column, and paste it back in place with text + values only.
Duplicates
A quick way to find duplicates in a block is to have all of its subjects or identifiers in Col A, and sort the block. Then, in the column immediately to the left of the block, enter the =EXACT(B1,B2) formula in the cell (the two cells are to the immediate right and then one above that for the two arguments). If the content in B1 and B2 are exactly the same, the formula will evaluate to TRUE, if not FALSE. Copy that formula down all rows adjacent to the block.
Every row marked with TRUE is a duplicate with respect to Col B. If you want to remove these duplicates, copy the entire formula column, paste it back as text and values only, and then sort that column and your source block. You can then delete en masse all rows with duplicates (TRUE).
You can test for duplicate matter across columns with the same technique. Using the =CONCATENATE() operator, you may temporarily combine values from multiple columns. Create this synthetic concatenation in its own column, copy it down all block rows, and then test for duplicates with the =EXACT() operator as above.
Search and Replace
The search function in spreadsheets goes well beyond normal text and includes attributes (like bolding), structural characters like tabs or line feeds, or regular expressions (regex). Regex is a particularly powerful capability that few know, but unlocks tremendous power. However, an exploration of regex is beyond the scope of this CWPK series. I have found simple stuff like recognizing capitalization or conditional replacements to be very helpful, but basic understanding let alone mastery of regex requires a substantial learning commitment.
I use the search box below the actual spreadsheet for repeat search items. So, while I will use the search dialog for complicated purposes, I put the repeated search queries here. To screen against false matches, I also use the capitalization switch and also try to find larger substrings that embed the fragment I am seeking but removes adjacent text that fails my query needs.
Another useful technique is to only search within a selection, which is selected by a radiobutton on the search dialog. Highlighting a single column, for example, or some other selection boundary like a block, enables local replacements without affecting other areas of the sheet.
String Manipulations
One intimidating factor of spreadsheets is the number of functions they have. However, hidden in this library are many string manipulation capabilities, generally all found under the ‘Text’ category of functions. I have already mentioned =CONCATENATE() and =EXACT(). Other string functions I have found useful are =TRIM() (removes extra spaces), =CLEAN() (removes unprintable characters), =FIND() (find substrings, useful for flagging entries with shared characteristics), and =RIGHT() (testing the last character is a string). These kinds of functions can be helpful in cleaning up entries as well as finding stuff within large, bulk files.
There are quite a few string functions for changing case and converting formats, I tend to use these less than the many main menu options found under Format → Text.
These functions can often be combined in surprising ways. Here are two examples of string manipulations that are quite useful (may need to adjust cell references):
For switching person first and last names (where the target is in A17):
=MID(A17,FIND(" ",A17)+1,1024)&", "&LEFT(A17,FIND(" ",A17)-1)
For singularizing most plurals (-ies to -y not covered, for example):
=IF(OR(RIGHT(A1,1)="s",RIGHT(A1,2)="es"),IF(RIGHT(A1,2)="es",LEFT(A1,(LEN(A1)-2)),LEFT(A1,(LEN(A1)-1))),A1)
This does not capture all plural variants, but others may be added given the pattern.
Often a bit of online searching will turn up other gems, depending on what your immediate string manipulation needs may be.
Other
One very useful capability, but close to buried in LibreOffice, is the Data → Text to Columns option. It is useful to splitting a column into two or more cells based on a given character or attribute, useful to long strings or other jumbled content. Invoke the dialog on your own spreadsheet to see the dialog for this option. There are many settings for how to recognize the splitting character, each occurrence of which causes a new cell to be populated to the right. Thus, it is best to have the target column with the long strings at the far right of your block (since when it makes splits, it populates cells to the right, but only if the splitting condition is met. Thus, if existing columns of information exist to the right, they will become jagged and out of sync.
Data Representations in Python
We are already importing the csv module into cowpoke. However, there is a supplement to that standard that provides a bit more functionality called CleverCSV. I have not tested it. There is also a utility to combine CSV files with glob, which relates more to pandas and is also a utility I have not used.
Please note there are additional data representation tips involving Python in CWPK #21.
Tips for Some Other Tools
As we alluded to in CWPK #25, Wikipedia, DBpedia, and Wikidata are already mapped to KBpedia and provide rich repositories of instance data retrievable via SPARQL. (A later installment will address this topic.) The results sets from these queries may be downloaded as flat files that can be manipulated with all of these CSV techniques. Indeed, retrievals from these sources have been a key source for populating much of the annotation information already in KBpedia.
You can follow this same method to begin creating your own typologies or add instances or expand the breadth or depth of a given topic area. The basic process is to direct a SPARQL query to the source, download the results, and then manipulate the CSV file for incorporation into one of your knowledge graph’s extraction files for the next build iteration.
Sample Wikidata queries, numbering into the hundreds, are great studying points for SPARQL and sometimes templates for your own queries. I also indicated in CWPK #25 how the SPARQL VALUE statement may be used to list identifiers for bulk retrievals from these sources.
You can also use the Wikipedia and Wikidata Tools plug-in for Google spreadsheets to help populate tables that can be exported as CSV for incorporation. You should also check out OpenRefine for data wrangling tasks. OpenRefine is very popular with some practitioners, and I have used it on occasion when some of the other tools listed could not automate my task.
Though listed last, text editors are often the best tool for changes to bulk files. In these cases, we are now editing the flat file directly, and not through a column and row presentation in the spreadsheet. As long as we are cognizant and do not overwrite comma delimiters and quoted long strings, the separate text and control attributes such as tabs or carriage returns can be manipulated with the different functions these applications bring.
A Conclusion to this Part
The completion of this installment means we have made the turn on our roundtrip quest. We have completed our first extraction module and have explained a bit how we can modify and manipulate the bulk files that result from our extraction routines.
In our next major part of the CWPK series we will use what we have learned to lay out a more complete organization of the project, as well as to complete our roundtripping with the addition of build routines.
Additional Documentation
As noted, there are multiple sources from multiple venues to discuss how to use spreadsheets effectively, many with specific reference to CSV files. We also have many online sources that provide guidance on getting data from external endpoints using SPARQL, the mapping of results from which is one of the major reasons for making bulk modifications to our extraction files. Here are a few additional sources directly relevant to these topics:
- Wikidata’s own SPARQL tutorial
- Bob DuCharme on getting full text from Wikipedia with SPARQL
- Querying Wikidata with Python and SPARQL from Towards Data Science
- Data Science at the Command Line’s scrubbing data.
*.ipynb file. It may take a bit of time for the interactive option to load.


